Selection Tools
[NOTE: This tutorial is for meshmixer02. meshmixer03 works in a similar way, but with some changes. Click the little + sign to the right of the Tool Name bar in meshmixer03 to get in-app help.]
Selection is the default mode in meshmixer. If you aren't currently dragging, dropping, etc, you are in selection mode. If in doubt, you can tell that you are in selection mode if the 'OK' button is greyed-out.
Since meshmixer only operates on patches of faces, there are no vertex or edge selection tools. You can only select faces. There are two face-selection tools - you can either draw a loop on the surface, or you can draw a stroke across the surface.
Initial Face Selection
[Surface Loop Selection]
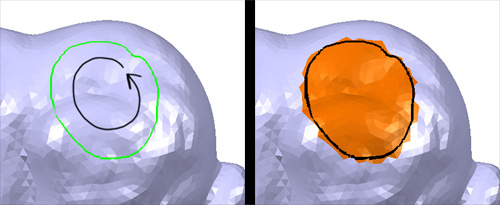
To select a loop on the surface, just draw the loop, by holding down the left mouse button. You will see a green line as you draw. If you draw in a single continuous stroke, you will need to close the loop. Once the loop is closed, a set of faces will be selected (colored orange) and your loop will turn black.
[MultiLoop Selection]
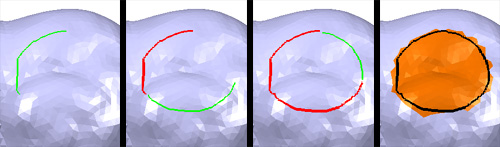
You can also draw your selection as multiple loops. Each stroke will turn red when you finish drawing. Each additional stroke must be attached to the previous one - if not, it will disappear. Once you close the loop, the interior faces are selected.
Note that you can rotate the model between strokes, so you can draw a loop that wouldn't be visible in a single view.
[Loop Selection Failure]
Sometimes the loop selection will fail. This usually happens when the loop skips over faces, meaning that there are back-facing polygons that can't be seen from the current viewpoint. Another problem can be if you draw too quickly - then the loop polyline only has a few vertices, which can cause the the algorithm that finds the interior faces to fail.
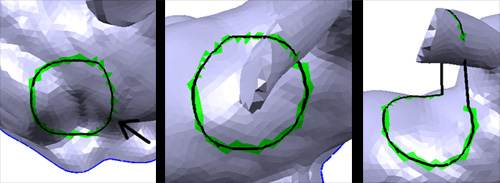
When this failure occurs, you will see a set of bright green triangles, but no orange triangles. There is no way to recover from this failure - hit the Cancel button or press ESC to try again (perhaps after rotating the model)
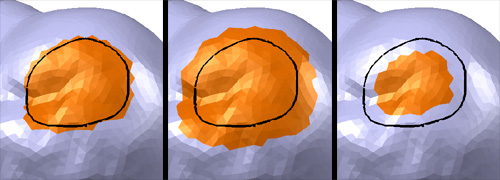
The example below-right is a clear case of where loop selection will fail. It is not possible to draw a loop across disconnected surfaces. The one on the left is more subtle - there are not actually any back-facing polygons, but many are nearly edge-on, so I would have to draw extra-slow to get the selection to work from this viewpoint.
[Laser Selection Tool]
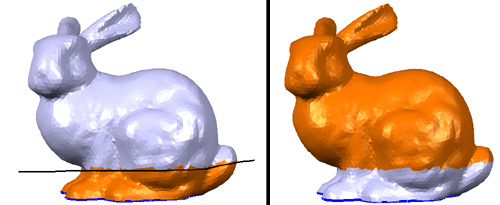
The other main selection tool is the laser selection, which is similar to lasso-selection in other tools. The laser selection cuts through the entire mesh, so both visible and occluded faces are selected. To begin a laser selection, start your stroke on the background (ie where there are no triangles under your cursor). The most straightforward thing to do is then to draw a full lasso, like you would in most other tools.
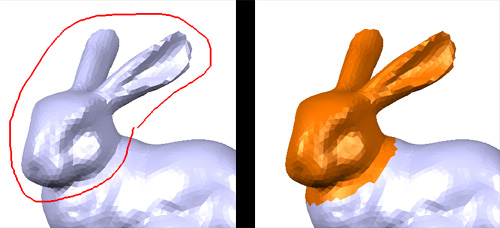
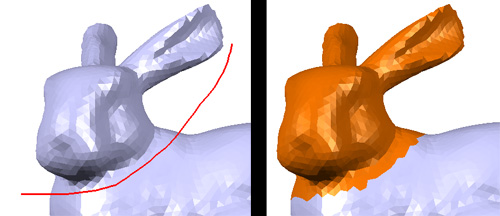
Laser selection doesn't actually require a lasso, though. The 2D polyline cuts space into two parts, and everything on one side gets selected. So the stroke below is enough to mark off the head.
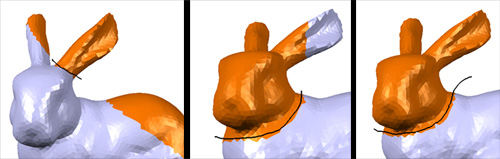
You can draw smaller strokes, but the system might get confused, as in the first two images below. Basically, you have to imagine the lines that continue on in the tangent directions at each end of the curve. So if you change the direction at the end of your stroke, you can control the selection and get better results, as shown below-right.
You cannot use more than one stroke to do a laser selection - when you draw another laser stroke, you will replace the previous selection. This means that you can just keep over-drawing until you get the selection you intended.
[Interior Toggle]
You may notice that for both Surface Loop Selection and Laser Selection, you don't have to tell meshmixer which part of the surface is supposed to be the 'inside' the selection, and which is 'outside'. I use a very simple heuristic - the one with the smaller number of triangles is 'inside'. This is nearly always right, but if it is not, just right-click on the background (the white area). This toggles which side is selected.
[Selection Brush]
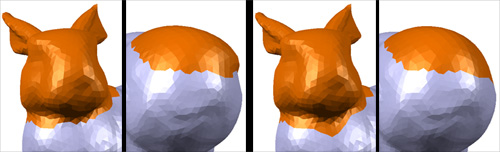
Cutting along nice edge loops will give a much better fills and drops, but meshmixer is not very good at knowing what a nice edge loop is. I do try to do a bit of optimization, but you will inevitably need to tweak it. To do that, once you have a selection you can left-click on an unselected face to add it to the selection, and right-click on a selected face to remove it. You can also left-drag and right-drag, to 'paint' selection/de-selection. The brush is only one pixel wide, though, so don't try to paint too quickly.
In the example below, you can see that the selection contains a few faces of the 'neck', and so the fill is not as smooth as I wanted. If I add a few more faces, I get a cleaner boundary loop, and the fill is much smoother.
[Selection Expand/Contract]
Once you have a selection, it can be useful to add or remove rings of faces around the boundary. You can do this by scrolling the mouse wheel. Scrolling up/forwards expands the selection, while scrolling the other way contracts it. The growth is controlled by distance across the surface, rather than face neighbours, as it seems like this is more intuitive on meshes with varying face size.
[Restore Last Selection]
If you undo a cut, I should restore your selection, but it doesn't work this way at the moment. I do store the most recently-used selection, though. You can recover it by pressing the 'r' key. But this only makes sense on the exact same mesh - if you try to restore with a different set of triangles, you will get garbage results.
The selection is actually stored in a file, called 'z_Last_Selection.txt', which is written to the current directory (the folder containing the last mesh file you opened). If you want to "save" a selection for later, just make a copy of this file. But remember, you have to use it on the exact same mesh.